At last, a more detailed description of the Face Tracking camera!
As you may have guessed, this project will use a pan/tilt mounted camera to find faces within a video stream, and then move two servo motors controlled by the PiSoC to place any detected faces into the center of the frame. This kind of technology is more commonly becoming available in commercial webcams, but making our own is much more satisfying.
Hardware
Note: If you purchased our Face Tracking project kit then all of this is included.
- Raspberry Pi (any model) with Raspberry Pi CSI Camera module (any model)
- We are going for high performance and embedded on this application, so that means it is time to break out our Raspberry Pi and the wonderful GPU accelerated Raspberry Pi Camera module. This should work on any version of the Raspberry Pi, but it works best on the Raspberry Pi 2 and 3. If you wish to run this on a Raspberry Pi 1 (Model A/B/A+/B+), then you may need to compile everything from source if using our pre-built image, which includes the project source, OpenCV, and the Pi Camera C++ API.
- Two servo motors mounted to a pan/tilt bracket
- PiSoC or PiSoC+
- Optional: Raspberry Pi camera mount to attach to pan/tilt bracket.
Software
Note: If you purchased our Face Tracking project kit then your kit will have come with all software pre-installed and ready for action. You can download our Raspberry Pi 2/3 Raspbian image with the Face Tracker installed here.
If you want to use your own image, this is perfectly fine, but there is a lot of software that will need to be installed/compiled to use this project. This includes
- OpenCV 3 (compile from source)
- C++ Raspberry Pi camera API
- Project source
Coming soon: A full build tutorial to go from a fresh install of Raspbian to Face Tracking.
Project Description
Lets start with the easy part, the servomotor control. The basic concept here is that one servomotor will be responsible for turning the camera horizontally (pan) and the other will control the vertical movement (tilt).
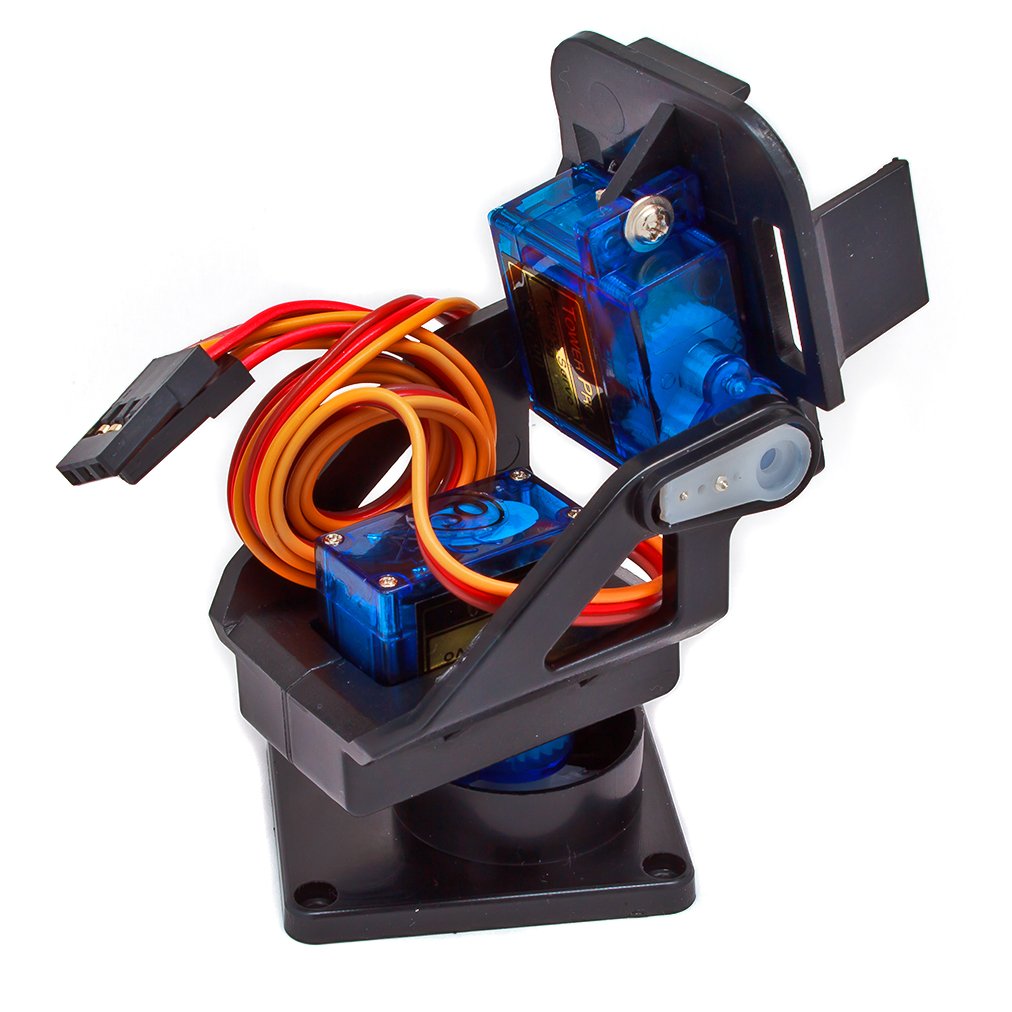
Pan/Tilt camera mount
The control system for the servomotors is extremely simple. Essentially, when a face is found it calculates how far from the center the face is, and if it is too far then it will take a single discrete step in whichever direction will bring it closer, for both the pan and tilt. It will simply continue doing this until the face is in the center.
Of course, the time to center the face could be improved significantly by making a more calculated choice of steps towards the face, or by implementing a simple PID controller. This kind of system is not difficult to implement and it does work very well for zoning in on the face as fast as possible. However, there is something creepy about the way the algorithm I chose to use closes in on you, and so I prefer it.
from pisoc import *
class Point(object):
	def __init__(self, x, y):
		self.x = x
		self.y = y
def Track(pan, tilt, center, target = Point(160, 120), threshold = Point(16, 24), delta = Point(4, 3)):
	if (center.x > target.x + threshold.x):
		pan.SetAngle(pan.ReadAngle() - delta.x)
	elif (center.x < target.x - threshold.x): pan.SetAngle(pan.ReadAngle() + delta.x) if (center.y > target.y + threshold.y):
		tilt.SetAngle(tilt.ReadAngle() + delta.y)
	elif (center.y < target.y - threshold.y):
		tilt.SetAngle(tilt.ReadAngle() - delta.y)
But as I mentioned, that is of course the easy part of the project. The real fun is the face detection. For this task, we use OpenCV cascade classifiers trained to frontal faces (not profile.) There is a lot of information about how face detection algorithms work, but here is a good simple description that describes the concept concisely.
The only difference between the description provided in the link above and in the way we implement face detection in this project is in the cascade classifier used to detect faces. The link above describes a Haar cascade classifier, which is typically more accurate, but we choose to use the LBP classifier which behaves similarly except that it restricts arithmetic to fixed point integers, which speeds things up.
Assembly
If you bought our kit, you’ll just need to plug everything in. If you are putting the kit together yourself, you might want to refer to this tutorial on Adafruit for assembling the pan/tilt bracket.
Note: Make sure you plug in power to your Pi as the last step, otherwise it might restart, or need to be restarted.
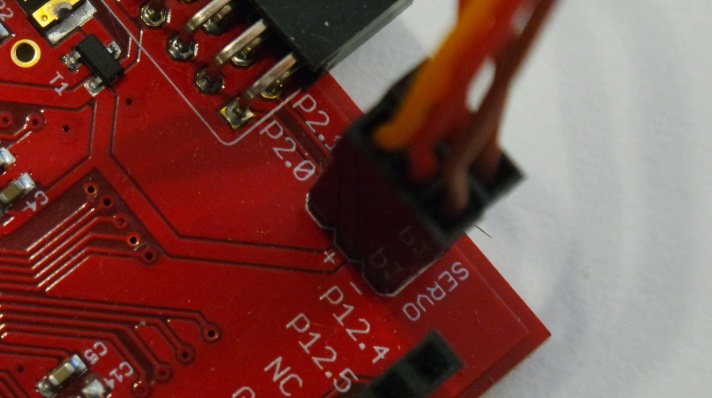
First, plug your servos into the PiSoC servo header. The Pan servo goes into P2.0, and the Tilt servo goes into P2.1. The brown wire coming from the servo goes into the pin labeled –.
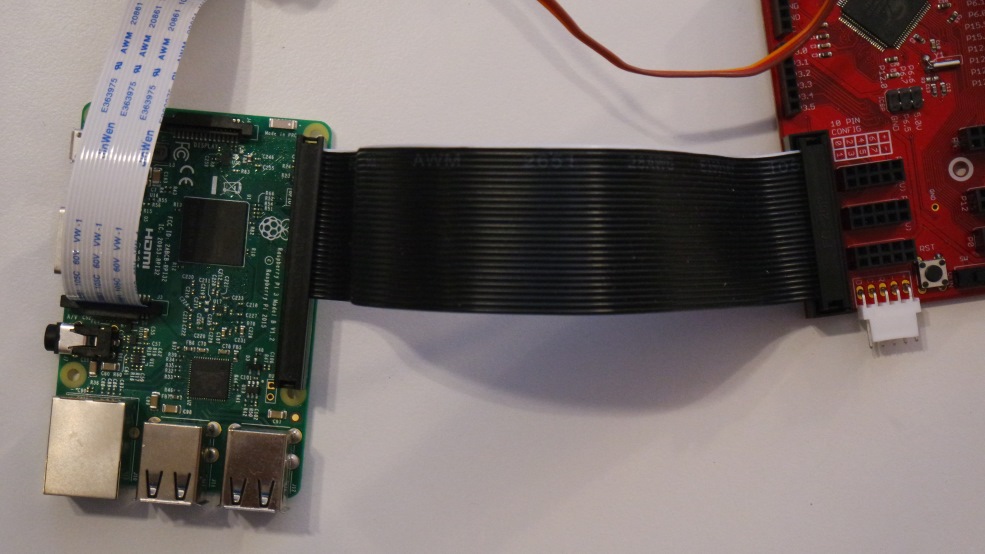
Next, plug the ribbon cable into the PiSoC Pi header, and into the Pi’s GPIO header.
After that, you’ll want to plug your camera into the Pi’s Camera port, and mount the camera onto the Pan/Tilt bracket. If you don’t have a Pi camera mount, tape will do just fine. Then you’ll want to plug your mouse, keyboard, and HDMI monitor into the Pi. You could also use SSH or VNC to control your Pi remotely instead.
Finally, plug your power supply into the Pi’s Micro USB port. Don’t skimp on the power supply you use. While I have been able to make it work with a phone charger, many of them won’t cut it when the Pi is under load. You’ll see a little rainbow colored square on the top right of the screen if the Pi isn’t getting enough power. This could cause the Pi to restart and possibly corrupt your SD card. I recommend this power supply.
You should now see your Pi boot up and bring you to the desktop.
Usage
If using our prebuilt image, launching the face tracker is as simple as clicking the Face Tracker icon on the desktop. If the video stream launches as expected and you notice the servo motors center themselves, then you are good to go!
Note: To exit the program, simply press the Escape key while focused on the video stream window.
However, if the window does not open, you may want to launch the program from the terminal for a description of what may have went wrong.
To launch from the terminal while logged in as pi, you simply need to enter into the terminal:
facetracker
Note that any changes to the source will not affect the program launched by these two methods.
Making changes and exploring the source
If using the prebuilt image, the source folders are included on the desktop so that you can’t miss them! You of course can move these wherever you please without affecting the program launchers.
Otherwise, you can find all source on our github
From a terminal window on your raspberry pi
cd ~
git clone https://github.com/EmbeditElectronics/Face-Tracker.git
Notice that there are two folders in this repository which contain source for a python version of the facetracker and a C++ version. Of course, the C++ version performs much faster even at a higher resolution, but the python version may be easier to work with for many people.
Python
To launch the python version, simply navigate to the python face tracker directory and run face.py
cd ~/Face-Tracker/python-face-tracker
python face.py
C++
There are actually two versions of the C++ face tracker, the one which is used for the desktop launcher, and a simpler (slower) version which is likely easier to follow for testing changes. The primary difference between the two versions is that the higher performing version multi-threads the three primary processes for the program, those being face detection, face tracking, and image capture/display. This allows the program to capture new images as fast as is possible, for it to detect faces whenever an image is available, and for it to track the most recently found face without forcing the remaining processes to wait for this to complete.
Also notice the pisoc.cpp and pisoc.hpp files included in this directory. These are a very basic implementation of an API for communication with the PiSoC through C++ over either a UART or I2C bridge. Note that the feature set included here is far from complete, but it should work until I eventually make it more robust and package it. Also note that I do use C++11 features in this API, so you will need to use the –std=C++11 flag in g++ 4.7+
For the build process, I chose to use scons instead of the traditional cmake (as I have done in the past). I find that it is a much more intuitive tool, especially for those with a python background. To change the build targets or linked libraries/include paths, simply make the appropriate edits to the SConstruct file, and build with:
scons
From the directory which contains the SConstruct file (in this case, the working directory.) To launch the two different face trackers in this directory:
./facetracker
./simpletracker
Ideas for expansion
Some ideas I’ve had (that I might get to myself eventually) are these:
- Change the detection algorithm from faces to things like colors (very easy in OpenCV!), or objects which you can train your own classifiers for!
- Add recognition to the face detection process. I have done this before so that it would recognize myself, as well as unknown males and females. It is a lot of fun to figure out.
- Add an additional thread to the detection process which scans each image for a profile view of the face instead of the frontal view. With this being implemented in a separate thread along with the frontal face detection, it would mean you can find a face in nearly any orientation within the video stream without a significant loss in performance.
- Launch the program automatically when the Pi boots up. This would be perfect for use in a prop or prank.
elliott
December 9, 2016 at 10:27 am
Hello, thanks for this great write up. I am in the business of selling photo booths and need a solution for the dslr camera to automatically tilt up or down to take pictures of both short or tall people. I’m currently using a manual tilt mechanism, but would love to have it automated. I do not need pan movement, just up and down tilt.
I was going to use this tilt mechanism https://www.servocity.com/637124 with this motorhttps://www.servocity.com/2-rpm-gear-motor
will these work with your project?
also I’m assuming the ribbon cable to connect your board to the rasberry pi is included if not where to buy?
Asanka
February 6, 2017 at 6:56 am
How can this be done without a PiSoc module? can you please upload a python code by just using GPIO pins?,
Thank you.
Robert Barron
February 8, 2017 at 6:05 pm
There are a lot of different add-on boards (GPIO probably isn’t going to cut it driving servos) that let you drive Servos with the Raspberry Pi other than the PiSoC. You’ll have to choose one and modify the code posted on the github. Changing the code will be pretty straight forward in C++ or Python. You just need to swap out the servo code such as pan.move, pan.setAngle, tilt.move, etc. and replace it with the equivalent code for the servo driver board of your choice.
plingboot
July 6, 2017 at 4:04 am
Great tutorial – I’m just about to work my way through it.
Just wondered whether you ever got around to making the “Fresh install of Raspbian to Face Tracking” tutorial?