This page will tell you everything you need to know to get started with the Embedit Circuit Playground Inventor’s Kit. The Inventor’s Kit will walk you through several activities that teach you Physical Computing with Scratch! You’ll be lighting up RGB LEDs, getting light, sound, and touch sensor readings, and a whole lot more in no time.
Intro
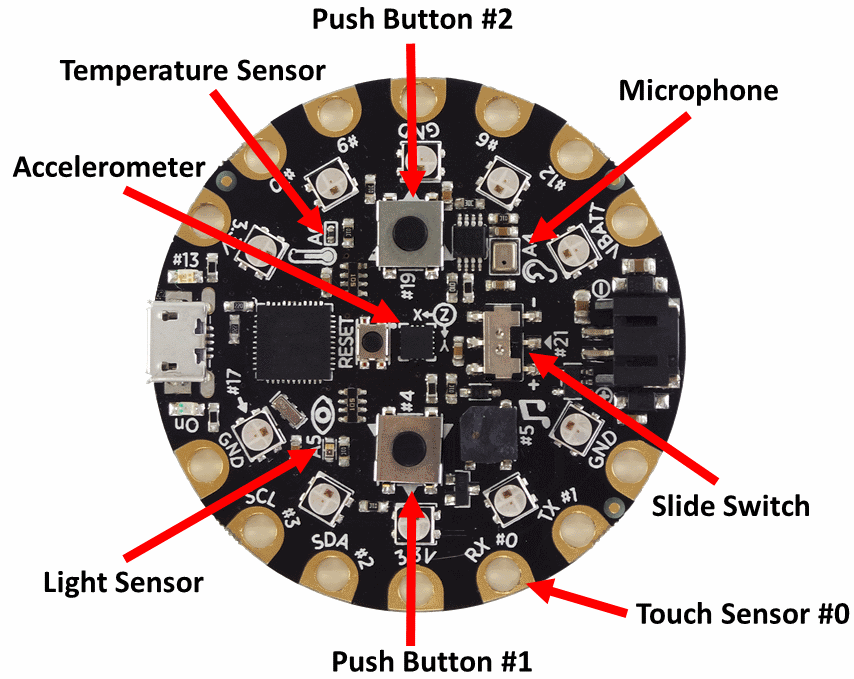
Locations of the sensors on the Circuit Playground. The symbols on the board also show what some of the sensors do.
You can get an intro to using Scratch over at the Scratch website. There you can make projects, or play with and edit other people’s projects to get yourself familiar with it. You can also follow the tutorials built into the Scratch program, which will help familiarize you with the basics. In addition to Scratch, the Circuit Playground also supports Arduino and Python Firmata. If you have a Circuit Playground, but didn’t buy it from Embedit, you can install the Scratch firmware by following this tutorial.
Installation
All you need to do is download our Scratch Connection App from the Google Chrome Web store. This plugin allows the Circuit Playground board to communicate over USB on your computer with Scratch. Right now, our kit is supported in the Google Chrome web browser for Windows 7,8,10, Chromebook, and macOS. If you don’t have chrome, get it here.
Usage
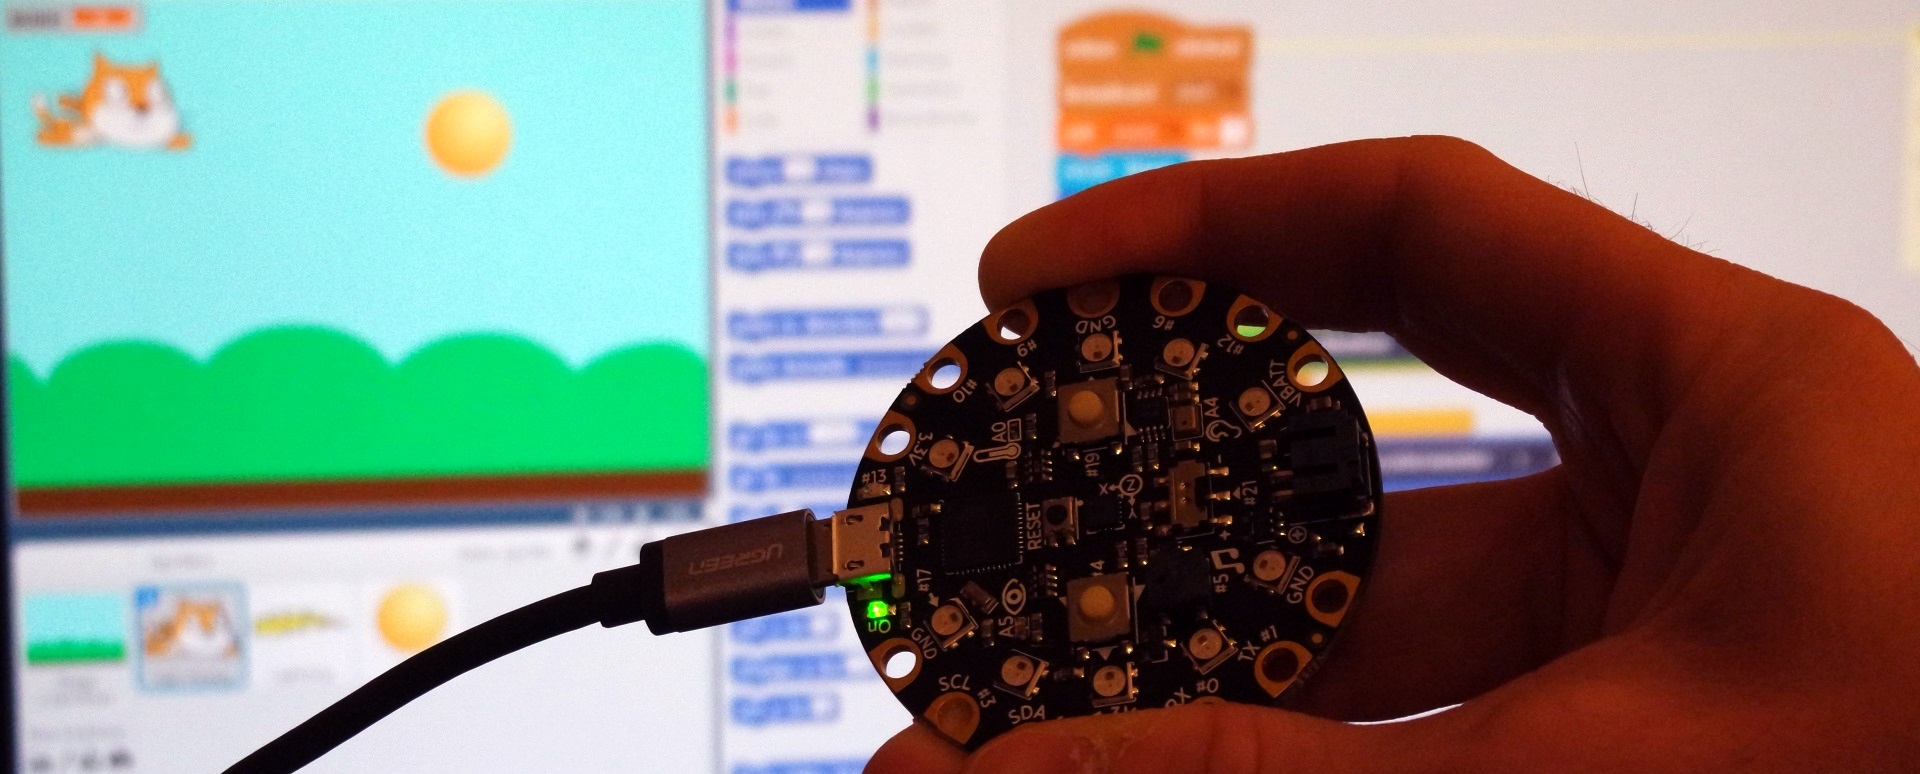
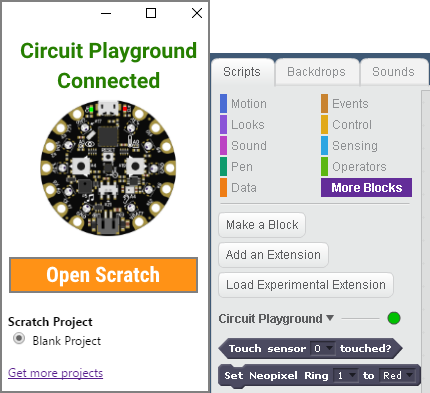
First, plug in the Circuit Playground board to your computer with the USB cable. Next you need to launch the Embedit Scratch connection app in the Chrome browser. You can find the app in the Chrome app launcher. Type or copy the following into the address/search bar at the top of the Chrome window:
chrome://apps/
Next, open up the Embedit Scratch Connection App. You should see a window pop up that says “Circuit Playground Connected” with a picture of the Circuit Playground board. If you don’t, consult the troubleshooting section at the bottom.
Finally, click the “Open Scratch” button. This will take you to a blank Scratch project where you can start experimenting!
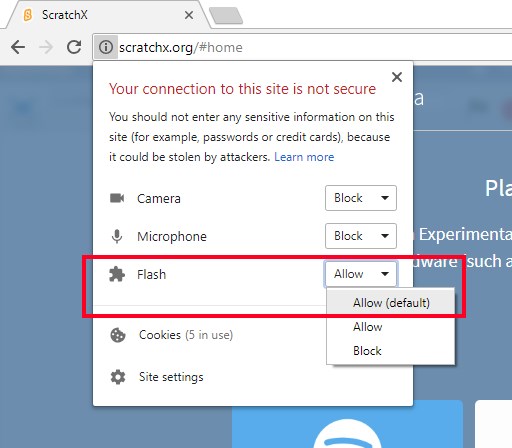
If the project doesn’t load when you try to open it through the Circuit Playground Scratch connection app and ScratchX.org opens instead, the most likely cause is Chrome blocking flash content (which powers Scratch) by default. You need to tell Chrome to allow flash content on the ScratchX.org website.
1. Go to http://scratchx.org
2. To the left of the web address at the top of the page, then click the green Lock or Info (i) icon.
3. At the bottom, click Site Settings.
4. In the new tab, to the right of “Flash,” click Allow (default).
5. Finally, go to http://scratchx.org/#scratch and click to enable flash content if the Scratch site does not display.
You should now be able to open projects through the Circuit Playground connection app. When you open the project again, Chrome may ask you to click the page to enable flash content.
You can go back to the Scratch Connection app by clicking on the Embedit “E” logo in your task bar at the bottom of the computer screen. Make sure you don’t minimize or close the Scratch Connection App or the Scratch blocks might become unresponsive. On the Mac you’ll need to make sure the Scratch Connection App is visible on your screen or the Scratch blocks might slow down.
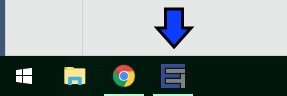
Click on the Embedit Icon to bring focus back to the app
Note: You can bookmark the apps page by clicking the star on the right side of your address/search bar. You can also make a desktop shortcut by right-clicking on the Embedit icon on the app page menu.
Both the Scratch Connection App and the Scratch program should show green and connected
Activities
Scratch Blocks – Learn what each of our Scratch Blocks do.
You can select from a few different projects right in the Scratch Connection App. Other projects will be listed below as they become available.
Blank Project – A template project with the Circuit Playground blocks loaded.
Neopixels 1 – Shows you the basics of using the Neopixel RGB LEDs on the Circuit Playground and Neopixel Matrix.
Touch Piano – Use the Circuit Playground’s touch sensors to create a simple 4 key piano.
Flappy Bird Touch – The massively popular Flappy Bird brought to Scratch! By default the game uses the space bar to flap the bird. How can you make it use the Circuit Playground’s touch sensor so that you can flap the bird with a banana instead? While you’re at it, hack the game to beat the high score, or to become invincible, the code is all there.
Accelerometer Game – Fly the Scratch Cat by tilting the Circuit Playground! Learn how the game works and how to modify it.
Advanced Scratch Extension – Advanced Neopixel Scratch blocks that allow for variable usage. Recommended for those who have some basic programming experience.
Useful Resources
Circuit Playground reference picture – Download and print out this handy picture which shows the locations of the sensors on the Circuit Playground.
Getting Started with Scratch – Learn the basics of Scratch by following the tutorial. You can also find other tutorials and user submitted Scratch projects on the Scratch website.
Going Further – Want to step up from Scratch? Follow our tutorial to set up your Circuit Playground to use Arduino or Python Firmata.
Changelog – Changelog for the Circuit Playground Scratch firmware.
Troubleshooting
If a project doesn’t load when you try to open it through the Circuit Playground Scratch connection app and ScratchX.org opens instead, the most likely cause is Chrome blocking flash content (which powers Scratch) by default. You need to tell Chrome to allow flash content on the ScratchX.org website.
1. Go to http://scratchx.org
2. To the left of the web address at the top of the page, then click the green Lock or Info (i) icon.
3. At the bottom, click Site Settings.
4. In the new tab, to the right of “Flash,” click Allow (default).
5. Finally, go to http://scratchx.org/#scratch and click to enable flash content if the Scratch site does not display.
You should now be able to open projects through the Circuit Playground connection app. When you open the project again, Chrome may ask you to click the page to enable flash content.
Further options for enabling flash can be found on the Chrome help page: https://support.google.com/chrome/answer/6258784
If the Circuit Playground Scratch Connection App shows disconnected, try hitting the small reset button (labeled “RESET”) in the middle of the Circuit Playground. You can also try plugging the Circuit Playground into a different USB port. See our Scratch blocks page for Scratch specific support.
If you have a problem getting set up, feel free to post in the comments section below.
tom hitron
November 28, 2016 at 11:23 am
Circut Playground does not connect. I’ve used Arduino to program Circut PlayGroundbefore but when tried to connect with you APP it didn’t not recognize him. I’ve been tring for hours now. Can you pls help me?
Robert Barron
November 28, 2016 at 11:54 am
Hi Tom,
You actually need to be using special firmware on the Circuit Playground – it will not work as is from Adafruit. I will be releasing the firmware for the Circuit Playground soon on github. I will also be selling the kit soon, which will have the firmware pre-installed. Very sorry I didn’t make things clearer on this page.
Thanks,
Robert
Jeff McDonald
December 23, 2016 at 8:23 pm
Hi Robert, I’m in the same boat as Tom. I have a Circuit Playground and was looking for exactly this tool. I’ll sing your praises far and wide if you could release the firmware on github.
Thanks,
Jeff
Robert Barron
December 23, 2016 at 9:08 pm
Hi Jeff,
As of today your wish is granted. The source code is now available on our github:
https://github.com/embeditelectronics/circuitplayground
But you’ll definitely want to follow my tutorial on getting the Arduino environment set up to compile this (or just flash the compiled hex with AVRDUDE, I go over both options), as I use LUFA USB HID instead of the normal Arduino USB libraries:
https://www.embeditelectronics.com/blog/project/circuit-playground-python-and-arduino-support/
I just finished writing the instructions and they are a little complex so please let me know if you have any trouble and I’ll try to help and make things clearer.
Thanks,
Robert
Jeff McDonald
December 24, 2016 at 12:26 am
Awesome! Thank you. I’ll be trying it out on Sunday with my nephew. That looks like excellent and clear documentation, with a lot of options.
Richard
December 31, 2016 at 12:00 am
Hi,
Great work. Love it. I would consider myself still a beginner with Arduino, but got everything to work on my PC (not on my Mac as you mentioned).
I could not find the “new advanced Neopixel ring” block. The “Set neopixel ring x to red” did not allow me to use a variable for the number of the neopixels. Are there plans to have an extension for the offline version of Scratch 2.0?
Thanks for your great product.
Richard
Robert Barron
January 3, 2017 at 5:56 pm
Great to hear you got it all working! The documentation went up a few days before the software, but it’s all up as of last night. You can now launch the advanced version of the Scratch blocks from the Embedit Scratch Connection app. You might need to update your Scratch connection app if Chrome hasn’t done it for you. To do it manually:
Click the 3 vertical dots in the upper right corner of Chrome. Click on More tools->Extensions. Then click the Update extensions now button at the top. The updated app will now display the app version number, which is currently 1.7.
Robert Barron
January 3, 2017 at 5:58 pm
As for offline support, we haven’t decided on the best way to accomplish that yet. We do support offline Scratch 2.0 for our other product, the PiSoC. We’re still looking at other solutions that might allow for offline Chromebook support, but we might still go with offline Scratch 2.0 for Windows/OSX.
Amnon
January 20, 2017 at 7:14 pm
Thanks for the work in setting this all up, but I can use a bit of help. I think I’m 95% there, but am missing one crucial step somehow –
I’ve uploaded the firmware to my circuit playground and I get the app’s mini window stating that “Circuit Playground Connected”. But when I click on open app my browser is redirected to this page:
http://scratchx.org/?url=https://embeditelectronics.github.io/circuitplayground/scratch_examples/blank_project.sbx
It’s an introduction page to ScratchX and I get options to open local file or open URL, but I can’t seem to find a way to get the Scratch interface working.
Can you please advise?
Thanks in advance!
Robert Barron
January 21, 2017 at 3:58 pm
When I click that link it goes to the ScratchX project. See this image: http://imgur.com/Zni9vKk
Maybe you have an adblocker blocking the continue popup? What OS and web browser are you using? I use adblock plus and it works fine with that. Anyway, it’s completely possible to launch any of these projects from the ScratchX homepage. Copy paste the url part of any the project links (https://embeditelectronics.github.io/circuitplayground/scratch_examples/blank_project.sbx) into the “Open extension URL” window. That should launch it too. If that still doesnt work you can go to our github (https://github.com/EmbeditElectronics/CircuitPlayground/tree/gh-pages), download the projects or extensions, and open them with the “Open Extension File” option. Let me know if that still doesn’t work.
Thanks
Amnon
January 21, 2017 at 6:39 pm
Thank you very much Robert! Indeed it was my FlashBlock add-on that was causing the issue. I’ve disabled it and it works perfectly now. Thank you!
I do have one other question though – In the code I can’t seem to be able to use a variable for the number of LED light in the “Set Neopixel Ring”. It would be very beneficial as it will allow to make loops to turn colors on and off in a short loop instead of using 10 blocks for each of the lights.
Is that something you plan to add in the near future?
Thanks and enjoy the weekend
Amnon
January 21, 2017 at 7:08 pm
Oh sorry, just realised that you can do exactly that under the “Advanced Scratch Extension”. Sorry for the confusion and thanks again for your help. I’m going to play around with this wonderful extension. Thanks!
Janet
March 15, 2017 at 1:37 pm
Any update on loading the firmware with Mac? I bought a bunch of these to use with my students and I’m eager to get started!
Robert Barron
March 20, 2017 at 6:17 pm
Glad to hear it! I now have a working OS X machine so I’ll be working on Mac support right away. I hope to have this done within 1-2 weeks. If you have good results with your students I hope you’ll consider buying some of my accessories such as the Neopixel Matrix. I plan to have a few more beyond that, including a servo motor adapter for the Circuit Playground.
Thanks!
Anonymous
March 24, 2017 at 2:53 pm
Sounds wonderful – I can’t wait! By the way, is there a reason that the Touch Sensor block only has 4 sensor choices (0-3) rather than the 8 that Circuit Playground is capable of? I know my students will want to do a lot with the touch sensors.
Thanks for all your great work, Robert. This is really fabulous!
Robert Barron
March 29, 2017 at 8:38 pm
The other 4 are currently reserved for the Neopixel Matrix, Servos, and general analog in. While I could make it so the user could pick which functions they wanted on which ports at runtime, I was looking to keep configuration and options as simple as possible to avoid confusion. This way each port number has a known function. In the future I could offer advanced firmware that offered that, or at least show you what to edit to make that possible. The Mac firmware is almost done, it’s been quite a bit more work than anticipated. I’ll make a blog post with details on it along with how to upload the firmware once it’s finished. Thanks for the encouragement!
Robert Barron
April 11, 2017 at 7:36 pm
Mac support is now available! See this blog post: https://www.embeditelectronics.com/blog/scratch/mac-os-x-support-now-available/
Let me know if you run into any issues.
Thanks
Julie
April 6, 2017 at 2:40 am
I didn’t see any blocks that would allow servo control, or any general-purpose blocks for numbered pins. Is this possible?
Robert Barron
April 7, 2017 at 7:26 pm
There are fully function servo control blocks (pins 9 and 10) in the Scratch extension you can see when you open a Scratch project. However, I haven’t documented them yet as I haven’t provided an easy way to actually hook servos up to the Circuit Playground. The documentation will come when I Iaunch a servo adapter peripheral. As for general purpose IO, that’s totally possible and I do intend to add that to a potentially even more powerful version of the advanced extension. As I said in the comment above, I tried to make each pin fixed function to keep the application usage and setup as simple as possible for the end user. What will likely happen is I’ll add another tier or two of advanced extensions with far more control over what pin does what for more advanced users. There does come a point where I could make it so complicated (but powerful) that it begins to defeat the purpose of using Scratch instead of Arduino for programming, and that’s what I’m trying to avoid in the current extension blocks.
Julie
April 9, 2017 at 3:50 am
Oh, I like the idea of tiers of advanced extensions! Keep it simple to encourage experimentation for beginners, and add flexibility to build on what they’ve learned, but not all at once: remove the scaffolding in multiple steps.
Julie
May 20, 2017 at 9:10 pm
Robert, I just noticed Adafruit has a new version of the board they’re calling the “Circuit Playground Express”, which works with MakeCode. (Only the express works with MakeCode.) Thoughts?
Robert Barron
June 12, 2017 at 7:42 pm
I’ll be evaluating the new Express in future blog post once I can get my hands on one. MakeCode and the other similar options like those for the BBC microbit tend to target older audiences than my kit targets. Specifically, they lack audio/visual artistic features that Scratch provides. These extra features of Scratch make it much more engaging for young kids. I’ll go into further detail once I can evaluate one.